Step 1.
- Connect the Line port on the Filter (microfilter/splitter) to the wall socket or patch panel.
- Connect the Modem/ADSL port on the filter to the ADSL/DSL port on the modem.
- Connect the Phone port on the filter to a fax or phone that is sharing the same line.
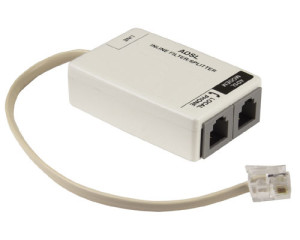
Fig A: ADSL Filter / Splitter
Step 2.
Ensure there is a clear dial tone on the line using a phone connected to the Phone port on the filter. Turn the modem on. Lights on the modem, including the ADSL/DSL light, will start blinking. If everything is connected correctly the ADSL/DSL/Sync light will stop blinking after roughly 1 minute and will stay solidly lit up.
Step 3.
Connect a computer or laptop to an Ethernet Port on the back of the modem using a network patch cable. The corresponding light on the modem to the Ethernet port you just connected to will light up and start blinking. This indicates a connection between the modem & the computer.

Fig B: Connecting the modem
Step 4.
If we have supplied your modem, it will come pre-configured with your ADSL username and password. If not, you will need to obtain these details from us then login & add them to the modem (please refer to our modem configuration pages for more details).
Step 5.
The Internet/PPP light will turn green and start blinking to indicate connection to the internet. If this light is off or red you will need to reconfigure the modem with the correct ADSL settings and try again.
For further troubleshooting please call our Tech Team on 1800 FLUFFY (1800 358 339)